A friend of mine recently moved into an apartment for the first time, and she asked me, “How do you do the food thing?” Of course I asked, “What food thing?”
“Like, groceries and cooking and all.”
Ok. Well THAT’S a loaded question. But it’s also a very fun question (for me).
While I explained my grocery/food prep-cooking methods via text, it occurred to me the other day that perhaps others might be in the same predicament.
So here is (what I hope to be the foolproof, overly detailed) run-down on the most important part (in my opinion, which might be redundant, since it’s my blog…) of “food prep”: freezing meat for food prep.
- If you have or have access to someone’s Costco membership, Costco is a fantastic place to buy meat. You can get your chicken thighs, chicken breasts, ground pork, ground beef and lamb shoulder (now we’re getting a little fancy) all from Costco. They also seem to always have a great selection of salmon or another kind of fish as well. Loblaws (Loblaw Great Food?) is also a great place to get meat, but it’s usually sold in smaller quantities.
- Don’t go cheap on meat. Buy decent quality meat when you can – it’s one thing to buy discounted bread or fruits when you know you’ll finish them within a day, and maybe it’s just me but with meat I wouldn’t cut corners.
- Buy your meat when you have time to go home and split it up into smaller portions for freezing, ie. Pick a day or days that you know you’ll have an hour or two to debone, defat (is that a word?), and freeze your goods.
So now you have your meat, it’s time to start the labelling process. (Monica! Where’s your label-maker?) I like to use those small clear plastic bags like the kind you see at Bulk Barn for small quantities of herbs, or if you’re feeling the Ziplock, then Ziplock baggies work well too (they’re just more expensive). It is easiest to write before filling the bags, which may seem like an obvious direction, but hey, I know from experience that Sharpie on a cold bag of meat doesn’t work too well! Grab a permanent marker and write out the name of the meat (more on this in the individual sections), and date.
Chicken Thighs
- Debone and defat (I’m quite sure this isn’t a word) the chicken thighs. Deboning helps the meat cook faster, and as a student, we all know time is a priceless thing we love to waste. I tend to take the skin off as well, but if you’re grilling the chicken in the oven then leave the skin on since it’ll help keep the chicken moist.
- Wash your chicken and dry with a paper towel.
- You may know that you like to cook and eat chicken in slices or chunks, so cutting up the chicken now will save you time later. Be sure to add a label such as, “cut up” or “chunks” since it’s a little harder to see when the chicken is frozen.
- You’ll find a labelling system that works for you. For chicken thighs, I use “CH thigh” (Brilliant, I know).
- Place chicken thighs in Ziplock or small bags; I bag the thighs in groups of 2 or 4. Consider how many people you usually cook for and label the bag accordingly.
- Double-bag that baby! Put all the labelled bags of chicken in a larger bag. I like using the meat bags or fruit and vegetable bags from the grocery store. Frozen knots are sometimes difficult to untie (I realize this sounds obvious or seems like it’s not a concern, but try tying a tight knot, freezing it, then untying it frozen, because you wouldn’t be defrosting the entire bag of chicken and come back and tell me how it goes), so if you’re tying a knot be sure you can untie it easily. Alternatively, you could twist the bag and grab it around a milk tab. (If that made no sense, and I’m sure it didn’t, scroll down and have a glance at the picture of ground beef).

Chicken Breasts
- Cut off the small, thin section that dangles off the breast and looks like an uncooked chicken finger/tender/cutlet. I cut all of these off then separate the cutlets into groups of about 8-10 and freeze them separate from the breasts. But your chicken, your choice, y’all!
- Wash and dry the chicken.
- If you want flat or thinner breasts for sandwiches or faster cooking, then cut the chicken breast into half lengthwise.
- Cut int0 stir-fry chunks of strips if you want. I make about two bags of cut up chicken breasts.
- Label. “CH breast” (Genius again.) Bag.
- Double-bag.
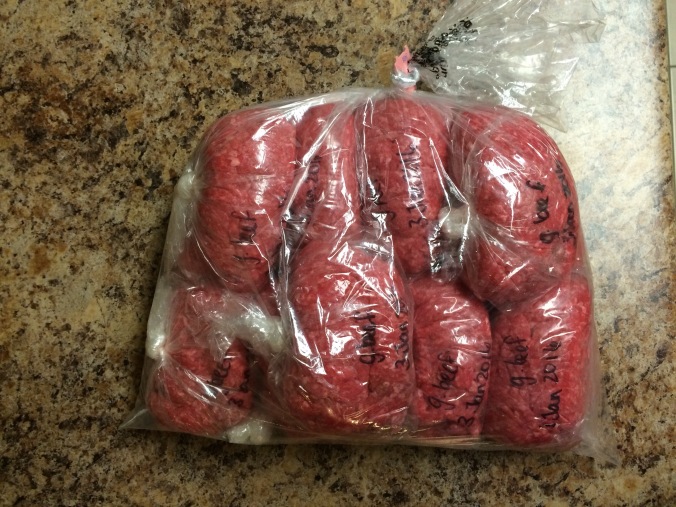
Ground Beef
- (Pardon my assumptions about how it is packaged). Without removing the plastic wrapping, press the meat evenly into the styrofoam packaging, so that when you divide the meat into sections or portions, it’s more evenly distributed and easier to divide. Unless you want to play the guessing game, then that’s cool too.
- Use a knife to cut through the plastic and divide the meat into portions. I tend to divide it into 6 or 8 sections. I was able to make 9 sections for some reason in the image below. Remove and discard the plastic (duh?).
- Label. “Gr. Beef” (I bet you didn’t see that one coming).
- Place portions in bags.
- Double-bag a bunch of the smaller bags.
Ground Pork
- Press meat evenly into styrofoam (just like the beef).
- Cut through and divide portions. When I use ground pork, I tend to make things like meatballs and use more meat, so I divide pork into 6 portions. You do you.
- Label. I’m not going to bother including my label example, because that’s just insulting.
- Meat –> Bag.
- … Yes, you guessed it. Double-bag.
P.S.
- The same process works for freezing beef, steaks, etc.
- If you don’t dry off the meat after washing it, when heated, the extra water will make spark and crackle (not the right words at all, but it’s 1am people), when the meat is heated in the pan as it heats with the oil. Hot pan and oil does not mix with water. You have been warned.
- Double-bagging helps prevent freezer burn. I don’t know how so don’t ask me why. I’m in English, remember?
- Be a smart adult. I am not responsible for any food poisoning or illness or injury or harm or whatever associated with the suggestions and instructions in this blog post. Wash your knives and sinks and cutting boards between meats. When in doubt, wash again. Raw meat ain’t funny folks.
So, now you can prep and freeze meat like a pro. A student pro. Live that student life efficiently!
